
-p-2000.png)


Webflow Shopify Integration (A Step-by-Step Guide)
Shopify and Webflow are among the leading platforms for eCommerce and website development.
Did you know that you can integrate the two platforms?
Integrating your Shopify store with Webflow is a great way to create a seamless and professional online shopping experience for your customers.
In this blog, we will show you how to easily integrate Shopify with Webflow in just 6 simple steps. But first, let's quickly explore what each platform offers to understand both platforms better. Let's dive in!
What is Webflow?
Webflow is a no-code website builder that provides an online visual editor to design and develop websites with absolute ease. You get complete design freedom with its no-code editor to build websites that are visually appealing while being robust and responsive.
Additionally, it helps you create interactions and animations to enhance the user experience without using any plugins.
What is Shopify?
Shopify is an eCommerce platform that enables businesses of all sizes to set up an online store. It helps you create an effective store integrated with social media, logistics partners, and payment gateway. To make things simple, it offers several templates and checkout pages.
Setting Up Webflow Shopify Integration
Integrating Shopify with Webflow helps you create a custom eCommerce store without relying on a pre-built Shopify template. The following steps will help you integrate the two platforms:
Step 1: Sign Up for a Shopify account

Visit Shopify to set up your account. Follow a simple sign-up process to name and create your online store.
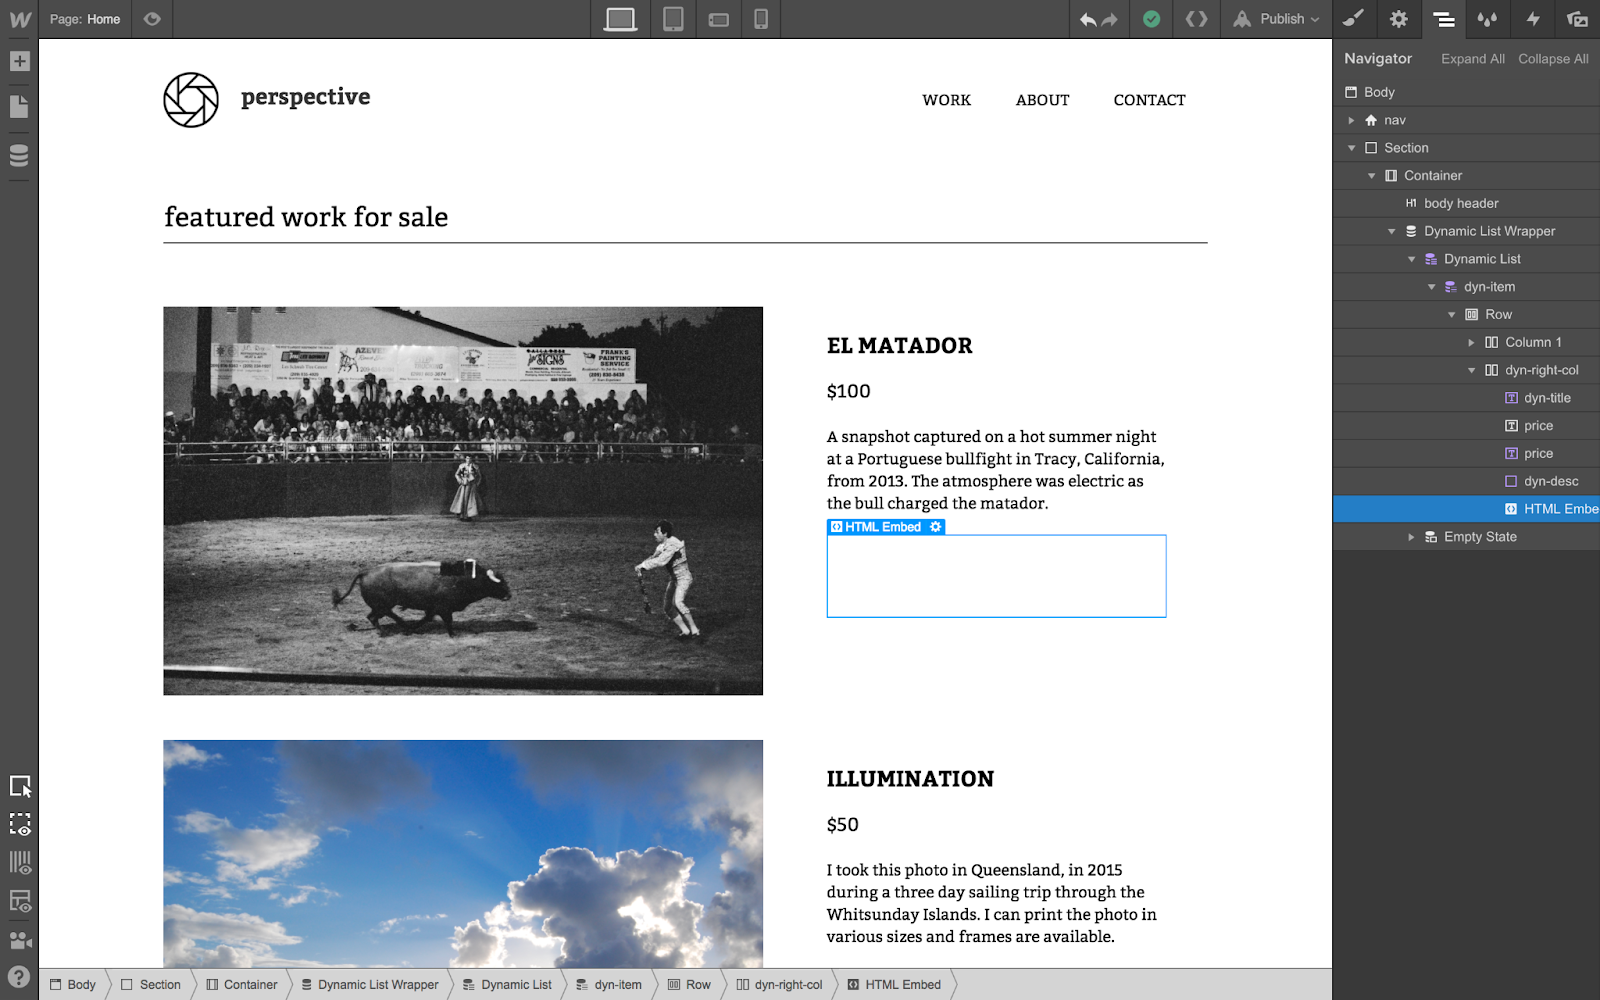
Step 2: Create a Webflow Collection for your Products
Before integration, you will have to create a Webflow Collection to store your product details. A collection is an individual record of data items like a product. You can define the various collection fields and populate them dynamically.
Define a unique field like a Product ID and Product Component to appropriately identify each product. Here is an example of a Product Collection on Webflow.

Each of these fields will help you structure your product.
Name: Add a name to the product
Price: Define the selling price of the product
Brief Description: Provide information about the product in 40-50 words describing the basic details of the product
Long Description: Add more details such as features, characteristics, the direction of use, and any additional information that the customer needs to know about the product.
Image: Add a thumbnail image to your product
Product Component: Add details of components or benefits of the product
Product ID: A unique identification code from the embedded code generated on Shopify
Step 3: Add your Shopify Products to the Mix
Get the Product ID and Product Component from Shopify, to begin the integration process. Here are the steps to generate the embed code in Shopify.
1. Navigate to the main Shopify dashboard and click on the Buy Button. You will find it on the left side of the dashboard.
2. Now select a product and click on Generate Code.
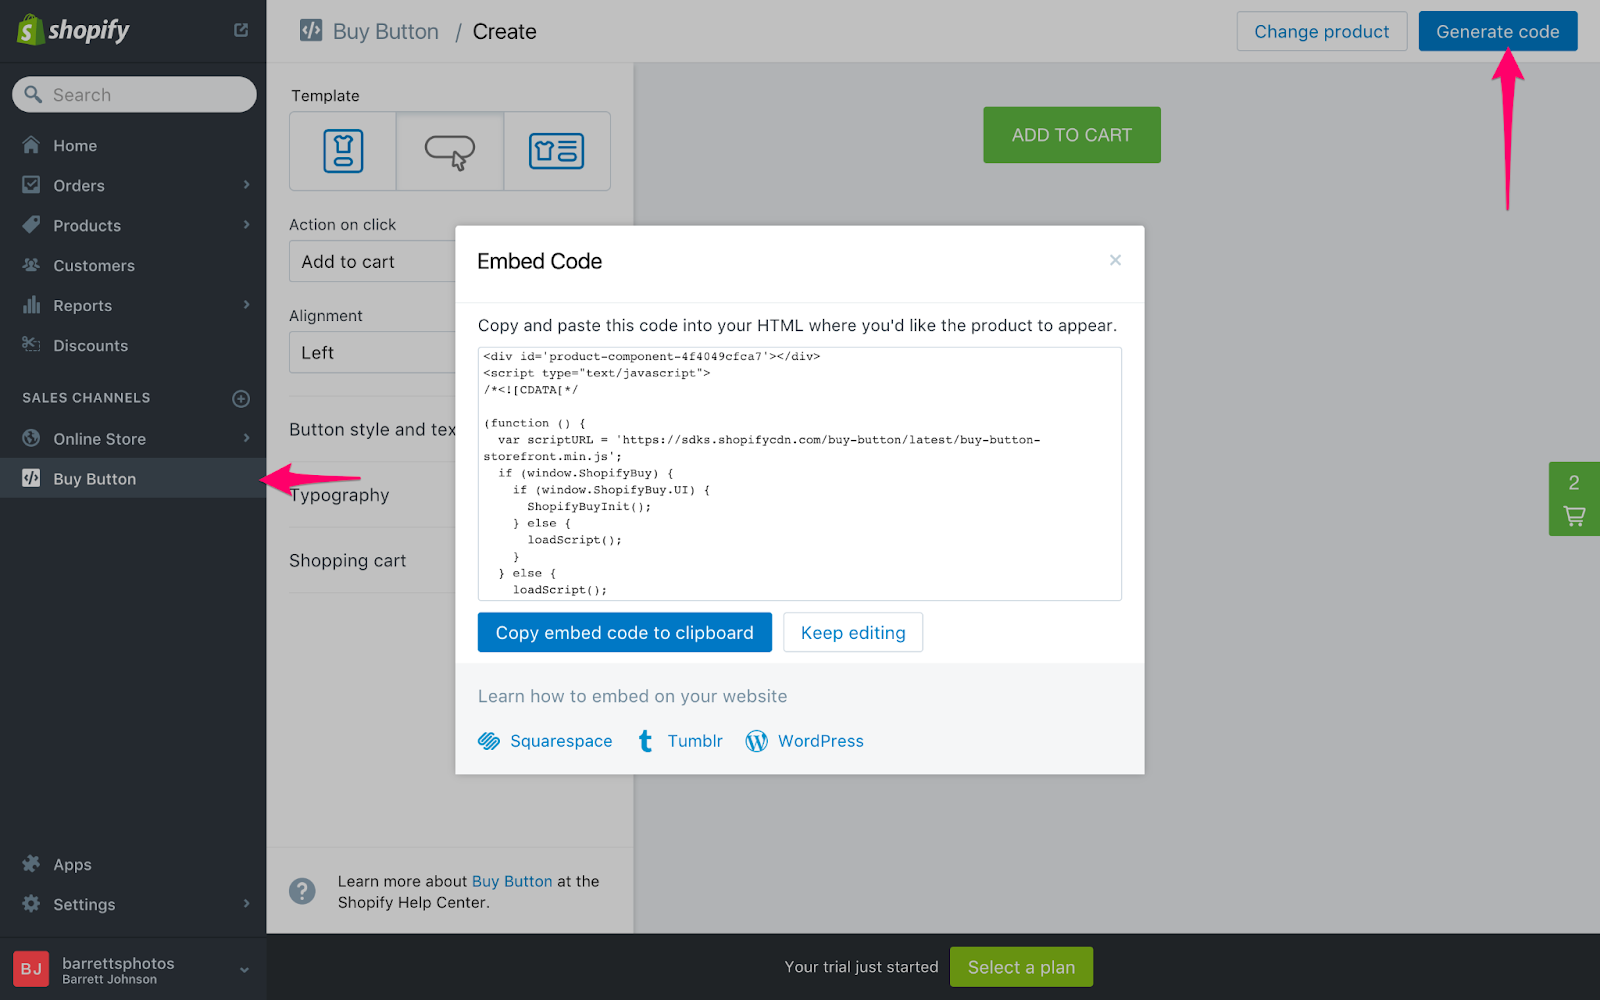
3. Once the embed code generates, you will find the values for the Product ID, and Product Component.
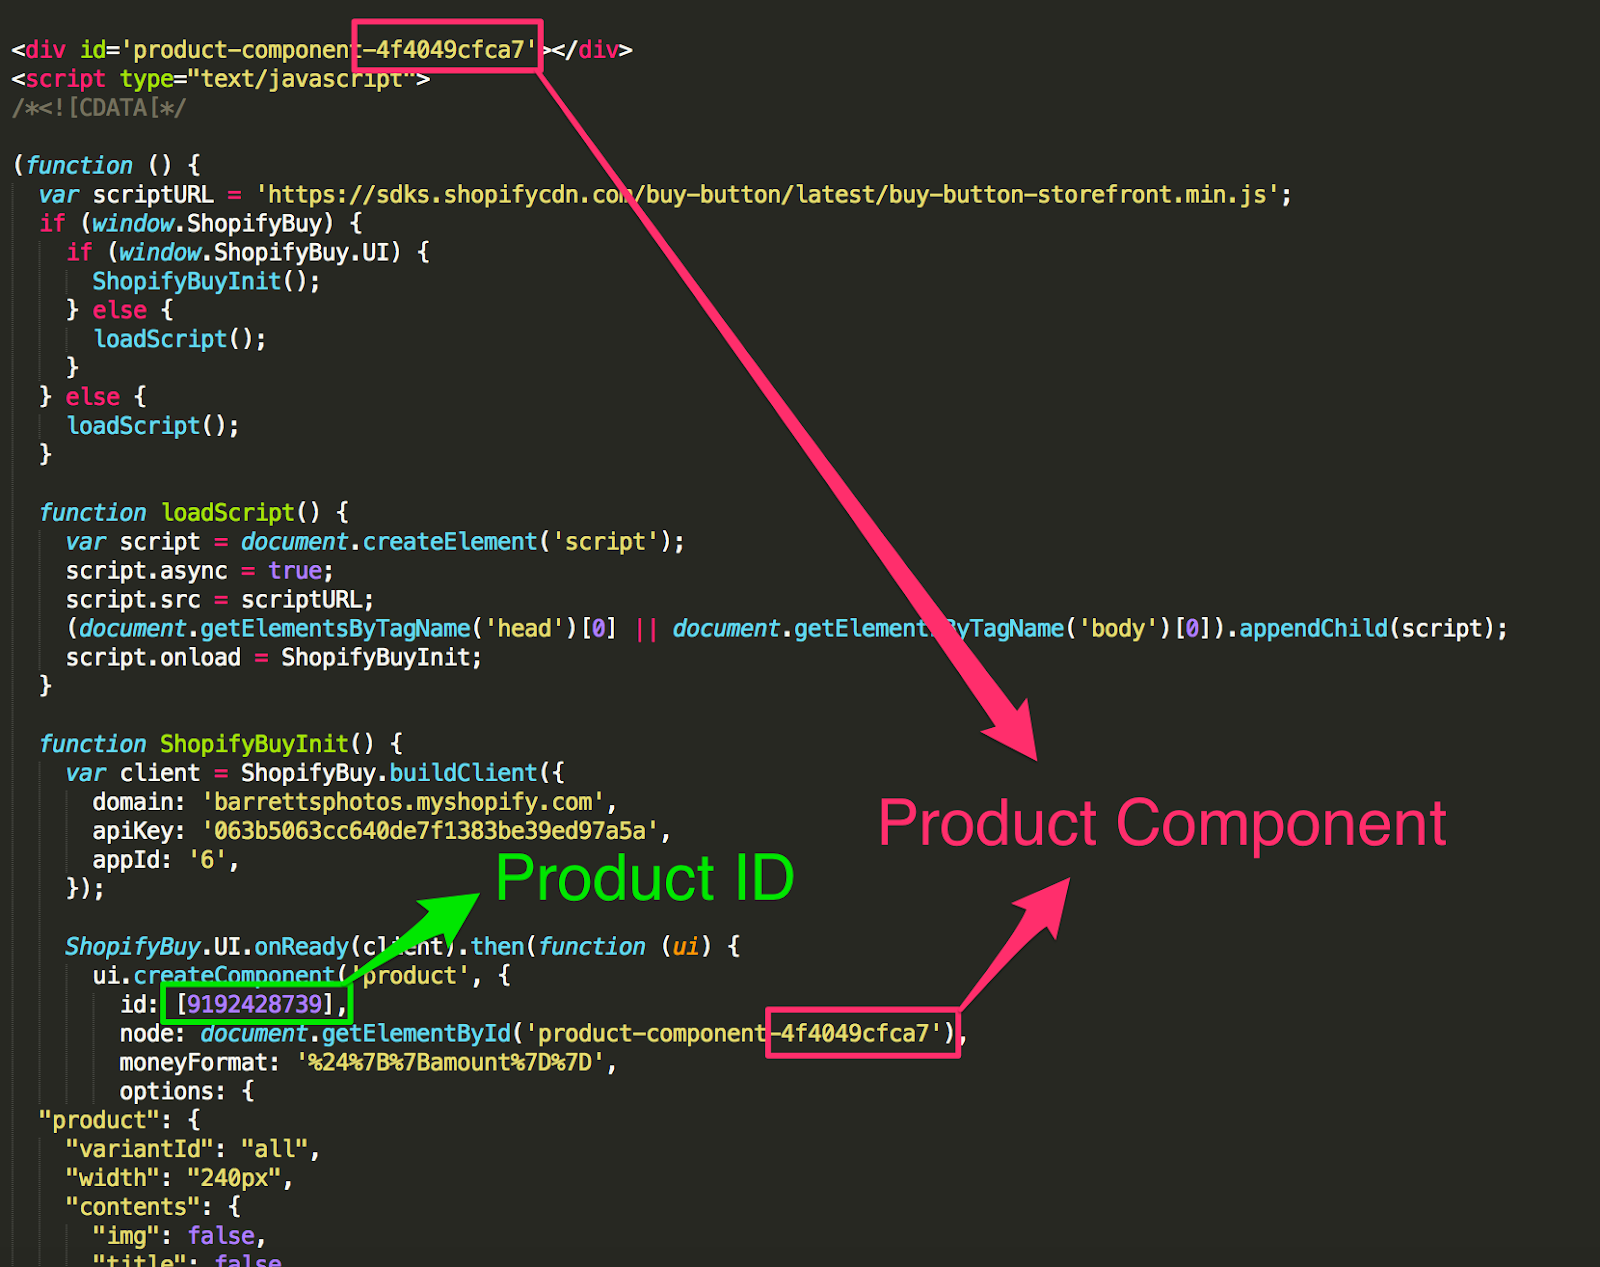
4. Copy these values from the code, and paste them into the corresponding fields of the Webflow collection you created in Step 2 .
Step 4: Add an Embed Component to your Collection
In order to use Dynamic Embeds, you must have a Collection Page or Collection List to hold the embeds. These types of pages or lists allow for the display of dynamic content, which is necessary for Dynamic Embeds to work.
For this example, we will be using a Collection List. Adding embed to a Collection page is also similar.
Drop the Embed Component into the Collection List you have designed for the products. Ensure that you place it where you want the Buy Button to appear.
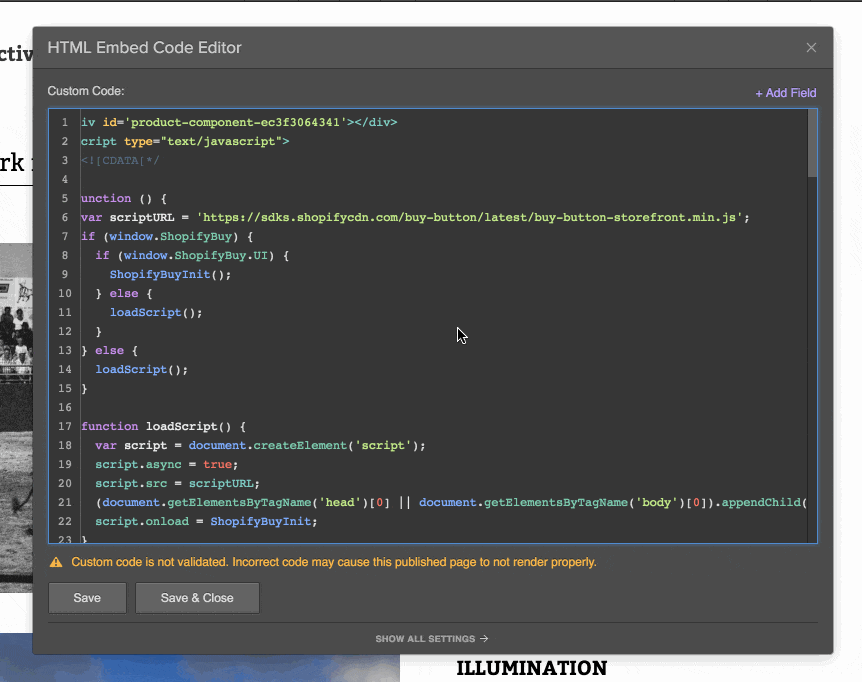
Step 5: Take the Embed Code from Shopify
Follow Step 3 to get the embed code from Shopify. You can get an embed code for the Buy Button or one that retrieves product images, names, and prices from Shopify. If you want maximum customizability, it is best to use the Buy Button embed code. Paste the copied code on the Embed Component created in Step 4.
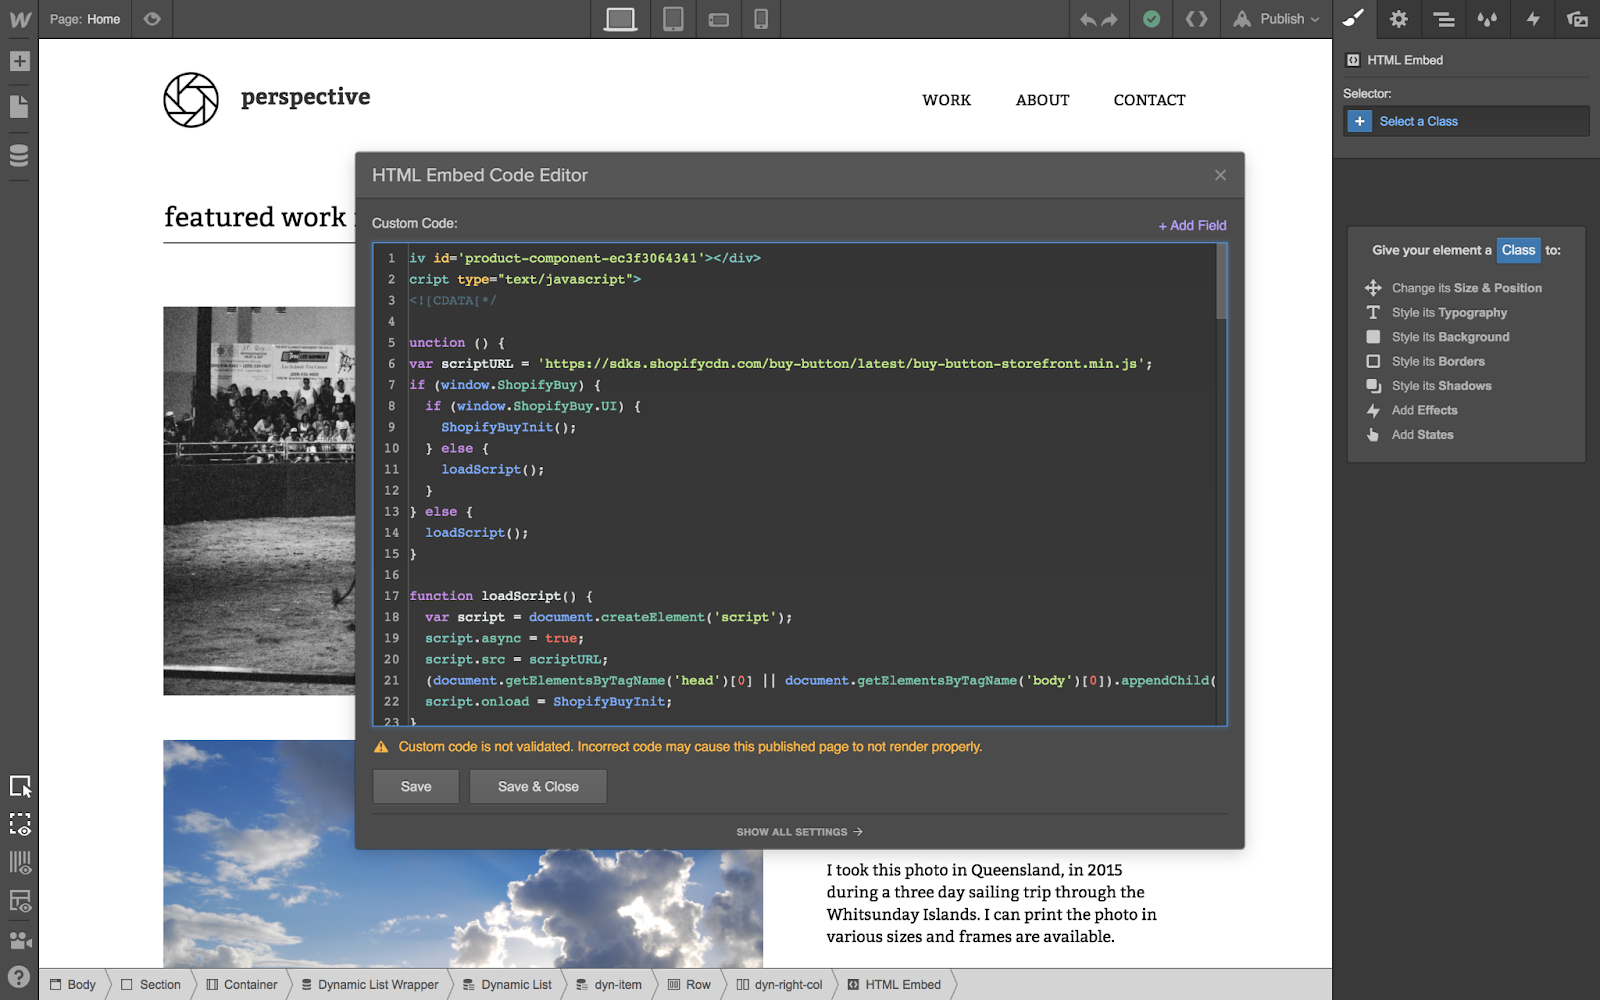
Step 6: Replace the Unique IDs with New Ones
To ensure each Buy Button is linked to a distinct product, replace the Product ID and Product Component in the Dynamic Embed with the Collection Fields.
In order to do this, highlight the Product ID or Product Component value and click on +Add Field at the top right to replace the content with our value.
When you test the page, you will notice that each button gets connected to a unique product.
That's it!
The Webflow Shopify integration is now complete, and you've successfully enhanced your online store's capabilities.
Also Read: Best Webflow Integrations & Plugins for Your Website
Benefits of Integrating Shopify with Webflow
Integrating Shopify with Webflow helps you create an enhanced shopping experience. It helps create a dynamic website with components from both platforms. You can leverage the no-code and designing freedom of Webflow with the functionality of Shopify.
The integration makes it easy for you to maintain and build new features quickly. It helps improve the customer experience and saves costs in the long run.
Integrating Shopify with Webflow also helps you make the website more functional and performance-driven. A fast and responsive website with the combined technologies of the two platforms makes it easy to improve conversions and sales.
Overall, the integration benefits your business and the customer. It improves your return on investment(ROI) and profits while providing an excellent customer experience.

Let's talk.
Get in touchFAQ
Can you use Webflow with Shopify?
Yes, you can use Webflow with Shopify to manage both your online store's design and e-commerce functionality. To set up the integration, you will need a Shopify and Webflow account to connect the two platforms. Once set up, you can use Webflow to design and customize your online store and manage the e-commerce functionality through your Shopify account.
Should I use Webflow or Shopify?
It depends on what your needs and goals are. Shopify is a great choice if you're looking for an all-in-one e-commerce solution, while Webflow is better suited for creating custom websites with more complex designs and interactions. You can use both platforms together if you want by integrating Shopify with Webflow to manage both the design and e-commerce functionality of your online store.
Is Webflow good for e-commerce?
Webflow can be used to build an ecommerce website, but it may not have all the features and functionality you need to fully manage an online store. We would recommend using Webflow for ecommerce by integrating it with an ecommerce platform like Shopify to handle backend functions such as managing orders, processing payments, and tracking inventory.
Need help? Our Webflow experts are just a click away. Contact us!

Editorial Team
Publisher

Editorial Team
Publisher
Subscribe to Seattle New Media Newsletter

Enter your details to get instant access
Get the File Now
If you'd like to download the file, enter your name and email below, and we'll send it directly to your inbox.
The file has been sent to your email. Please check your inbox!
Shopify and Webflow are among the leading platforms for eCommerce and website development.
Did you know that you can integrate the two platforms?
Integrating your Shopify store with Webflow is a great way to create a seamless and professional online shopping experience for your customers.
In this blog, we will show you how to easily integrate Shopify with Webflow in just 6 simple steps. But first, let's quickly explore what each platform offers to understand both platforms better. Let's dive in!
What is Webflow?
Webflow is a no-code website builder that provides an online visual editor to design and develop websites with absolute ease. You get complete design freedom with its no-code editor to build websites that are visually appealing while being robust and responsive.
Additionally, it helps you create interactions and animations to enhance the user experience without using any plugins.
What is Shopify?
Shopify is an eCommerce platform that enables businesses of all sizes to set up an online store. It helps you create an effective store integrated with social media, logistics partners, and payment gateway. To make things simple, it offers several templates and checkout pages.
Setting Up Webflow Shopify Integration
Integrating Shopify with Webflow helps you create a custom eCommerce store without relying on a pre-built Shopify template. The following steps will help you integrate the two platforms:
Step 1: Sign Up for a Shopify account
Visit Shopify to set up your account. Follow a simple sign-up process to name and create your online store.
Step 2: Create a Webflow Collection for your Products
Before integration, you will have to create a Webflow Collection to store your product details. A collection is an individual record of data items like a product. You can define the various collection fields and populate them dynamically.
Define a unique field like a Product ID and Product Component to appropriately identify each product. Here is an example of a Product Collection on Webflow.
Each of these fields will help you structure your product.
Name: Add a name to the product
Price: Define the selling price of the product
Brief Description: Provide information about the product in 40-50 words describing the basic details of the product
Long Description: Add more details such as features, characteristics, the direction of use, and any additional information that the customer needs to know about the product.
Image: Add a thumbnail image to your product
Product Component: Add details of components or benefits of the product
Product ID: A unique identification code from the embedded code generated on Shopify
Step 3: Add your Shopify Products to the Mix
Get the Product ID and Product Component from Shopify, to begin the integration process. Here are the steps to generate the embed code in Shopify.
1. Navigate to the main Shopify dashboard and click on the Buy Button. You will find it on the left side of the dashboard.
2. Now select a product and click on Generate Code.
3. Once the embed code generates, you will find the values for the Product ID, and Product Component.
4. Copy these values from the code, and paste them into the corresponding fields of the Webflow collection you created in Step 2 .
Step 4: Add an Embed Component to your Collection
In order to use Dynamic Embeds, you must have a Collection Page or Collection List to hold the embeds. These types of pages or lists allow for the display of dynamic content, which is necessary for Dynamic Embeds to work.
For this example, we will be using a Collection List. Adding embed to a Collection page is also similar.
Drop the Embed Component into the Collection List you have designed for the products. Ensure that you place it where you want the Buy Button to appear.
Step 5: Take the Embed Code from Shopify
Follow Step 3 to get the embed code from Shopify. You can get an embed code for the Buy Button or one that retrieves product images, names, and prices from Shopify. If you want maximum customizability, it is best to use the Buy Button embed code. Paste the copied code on the Embed Component created in Step 4.
Step 6: Replace the Unique IDs with New Ones
To ensure each Buy Button is linked to a distinct product, replace the Product ID and Product Component in the Dynamic Embed with the Collection Fields.
In order to do this, highlight the Product ID or Product Component value and click on +Add Field at the top right to replace the content with our value.
When you test the page, you will notice that each button gets connected to a unique product.
That's it!
The Webflow Shopify integration is now complete, and you've successfully enhanced your online store's capabilities.
Also Read: Best Webflow Integrations & Plugins for Your Website
Benefits of Integrating Shopify with Webflow
Integrating Shopify with Webflow helps you create an enhanced shopping experience. It helps create a dynamic website with components from both platforms. You can leverage the no-code and designing freedom of Webflow with the functionality of Shopify.
The integration makes it easy for you to maintain and build new features quickly. It helps improve the customer experience and saves costs in the long run.
Integrating Shopify with Webflow also helps you make the website more functional and performance-driven. A fast and responsive website with the combined technologies of the two platforms makes it easy to improve conversions and sales.
Overall, the integration benefits your business and the customer. It improves your return on investment(ROI) and profits while providing an excellent customer experience.
FAQ
Can you use Webflow with Shopify?
Yes, you can use Webflow with Shopify to manage both your online store's design and e-commerce functionality. To set up the integration, you will need a Shopify and Webflow account to connect the two platforms. Once set up, you can use Webflow to design and customize your online store and manage the e-commerce functionality through your Shopify account.
Should I use Webflow or Shopify?
It depends on what your needs and goals are. Shopify is a great choice if you're looking for an all-in-one e-commerce solution, while Webflow is better suited for creating custom websites with more complex designs and interactions. You can use both platforms together if you want by integrating Shopify with Webflow to manage both the design and e-commerce functionality of your online store.
Is Webflow good for e-commerce?
Webflow can be used to build an ecommerce website, but it may not have all the features and functionality you need to fully manage an online store. We would recommend using Webflow for ecommerce by integrating it with an ecommerce platform like Shopify to handle backend functions such as managing orders, processing payments, and tracking inventory.
Need help? Our Webflow experts are just a click away. Contact us!
Editorial Team
Publisher
Subscribe to Seattle New Media Newsletter
Editorial Team
Publisher
Get the File Now
If you'd like to download the file, enter your name and email below, and we'll send it directly to your inbox.
The file has been sent to your email. Please check your inbox!
Final Word
Whether you are a small business or an enterprise, the integration of Shopify and Webflow can immensely benefit your company. In six simple steps, you can leverage the best of these platforms.
So what are you waiting for? Integrate these dynamic platforms today to save time and scale your business.
If you're still confused or need additional support setting up the integrations, feel free to contact our Webflow experts.
Related Articles:
Webflow Mailchimp Integration (Made EASY in Just 7 Steps)
Webflow for Blogging: Everything You Need to Know
Best Webflow Website Examples for Inspiration


Hi, I'm Mike!
If you are enjoying the article, feel free to subscribe to our monthly newsletter.
If you have any project requirements, please contact us.


